

Quick answer: To start a WordPress website you need three things: a domain name, a web hosting account that meets WordPress’s requirements, and the free WordPress software installed on that hosting. Then you set a few important options, choose a theme, add the basic pages visitors expect, and publish your first content. The technical setup is short; building a site worth visiting takes longer.
This guide explains each step in plain language and points to the official WordPress documentation where the details matter. It does not recommend a specific hosting company, and it does not include prices, because those change often and you should check them on the provider’s own page.
Before you start: what you are actually building
The name “WordPress” can mean more than one thing. WordPress.org provides the free, open WordPress software. On its download page, WordPress describes two paths: install it yourself, which suits people who are comfortable getting their own hosting and domain, or choose one of its recommended hosts for a simpler route. Recommended hosts are one option, not a requirement: WordPress’s requirements page says any server that runs PHP and MySQL will work. WordPress.com is a different website from WordPress.org and is not covered in this guide. If you are considering it, read its own pages first so you understand what it includes.
This guide covers the self-install path: a WordPress site on hosting and a domain that you arrange yourself. In our view, that also means you take on responsibility for keeping the site secure, backed up and updated, although many hosts help with some of these tasks.
Step 1: Choose a domain name
A domain name is your site’s address, such as yourbrand.com. Pick one that is short, easy to spell and easy to say aloud, and avoid hyphens and numbers if you can. Check that the name is not already used by another brand. You can usually buy a domain from a registrar or from the same company that provides your hosting; either way, make sure the account is in your own name and that you keep the login details safe.
Step 2: Choose hosting that meets WordPress’s requirements
WordPress publishes the server requirements it recommends. At the time of writing, the official requirements page recommends:
- PHP version 8.3 or newer
- MySQL 8.0 or newer, or MariaDB 10.11 or newer
- Support for HTTPS
- A web server such as Apache or Nginx (the page says any server that runs PHP and MySQL will work)
The same page warns that older environments, PHP 7.4 and MySQL 5.5.5, still run WordPress but are end-of-life and may expose your site to security vulnerabilities. Version numbers change over time, so check the current requirements page before you buy.
When you compare hosting plans, ask these questions on the provider’s own pages or through its support:
- Does the plan meet the current PHP and database versions above, and does it include HTTPS?
- Is there a one-click WordPress installer, or will you install it manually?
- Are backups included, how often are they taken, and how do you restore one?
- What is the renewal price compared with the first-term price?
- How can you reach support, and what do they cover?
The point is simple: choose a plan that meets the official requirements, and read the renewal terms before you pay.
Step 3: Install WordPress
Many hosts offer a one-click installer, which is the easiest route. The official installation guide says a manual install usually takes less than five minutes. In outline, a manual install works like this:
- Download WordPress from wordpress.org/download and unzip the package.
- Make sure you have a database, and a database user with permission to use it. Many hosts create this for you.
- Upload the files to your site’s web folder using FTP or your host’s file manager.
- Open your site address in a browser and follow the setup screen.
The setup screen asks for your site title, an admin username, a password (entered twice), your admin email address, and an option to discourage search engines from indexing the site. WordPress says you can change all of these later.
Choose a strong admin login
The installation guide advises using a strong password with mixed case, numbers and symbols, and storing it safely. Avoid an obvious username such as “admin”, and use an email address that you actually read, because password resets go there.
Step 4: Set the options that matter first
Search engine visibility
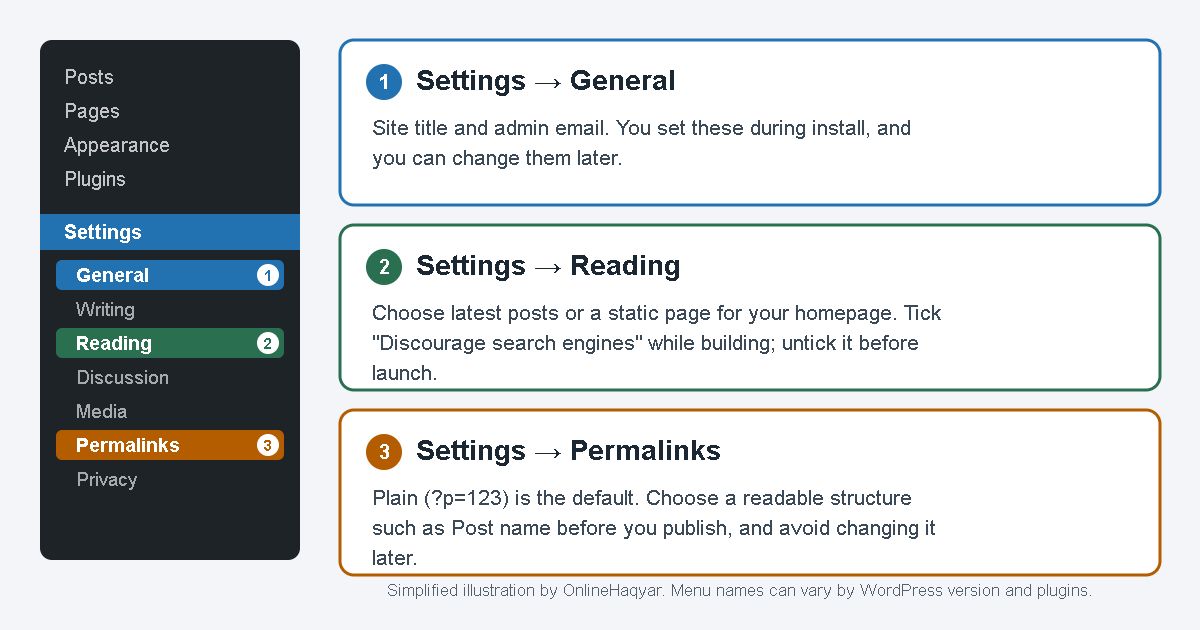
Under Settings → Reading, the option “Discourage search engines from indexing this site” adds a noindex tag to your pages (since WordPress 5.3). It is useful while you are building a site that is not ready. WordPress’s documentation also notes that this option does not block access to your site; it is up to search engines to honor the request. Once you are ready to launch, make sure the box is unchecked, or your pages will ask search engines to stay away.
Permalinks
Permalinks are the permanent addresses of your pages and posts. Under Settings → Permalinks, the default “Plain” structure produces addresses like ?p=123. WordPress’s documentation describes Plain as not user-friendly and not optimized for search engines, and offers structures such as “Post name” that put readable words in the address. The same documentation says permalinks are permanent and should never be changed, so choose your structure before you publish and then leave it alone.
Homepage display
Also under Settings → Reading, you choose whether your homepage shows your latest posts or a static page you design. A static page is useful for a site that needs a clear introduction; a latest-posts homepage suits a simple blog. You can change this later, but plan it before launch.
Step 5: Choose a theme and keep it simple
A theme controls how your site looks. Start with a lightweight theme from the official WordPress theme directory, and resist installing several. Every extra theme or plugin is something you have to keep updated and secure. Add a plugin only when you can name the specific job it does.
Step 6: Add the basic pages visitors expect
This is our recommendation, not a WordPress requirement. Before you publish articles, consider creating a few basic pages so visitors can see who runs the site and how to reach you.
- About: what the site covers, who is behind it and why.
- Contact: a working email address or form.
- Privacy Policy: what data the site collects, written to match your real setup.
- Terms and Disclaimer: if they are relevant to your site.
- Affiliate Disclosure: if you ever use affiliate links.
This is general guidance, not legal advice. Do not copy another site’s legal text without checking that it matches what your site actually does, and ask a qualified professional if you are unsure. Our own approach to corrections and sourcing is explained in the Editorial Policy.
Step 7: Publish your first content
Create a handful of genuinely useful posts before you promote the site. Decide who each post is for and what question it answers, then write it for that reader. An AI assistant can help you outline or tidy a draft, but you are responsible for checking every fact. If you want to try that, our beginner’s guide to writing AI prompts shows how to ask clearly, and What Is Generative AI? explains the limits you should keep in mind.
Step 8: Protect the site
- Keep WordPress, your theme and your plugins updated.
- Use strong, unique passwords and keep them in a password manager.
- Confirm that your host takes backups, and learn how to restore one.
- Remove themes and plugins you are not using.
These are general good practices rather than a complete security plan. Your host’s documentation and the official WordPress hardening guides go further.
Common beginner mistakes
- Leaving “Discourage search engines” ticked after launch.
- Keeping the default Plain permalink structure, then changing URLs after publishing.
- Installing many plugins “just in case”.
- Skipping backups until something goes wrong.
- Publishing before the About, Contact and Privacy pages exist.
- Copying a template policy that does not match what the site really does.
Beginner checklist
- Domain name chosen and registered in your name.
- Hosting plan that meets the current WordPress requirements and includes HTTPS.
- WordPress installed with a strong admin password.
- Search engine visibility unchecked at launch.
- Permalinks set to a readable structure before publishing.
- A simple theme, and only the plugins you need.
- About, Contact and Privacy pages published.
- Backups confirmed, and updates switched on or scheduled.
- First useful articles published.
Frequently asked questions
Is WordPress free?
The WordPress software is free, as WordPress.org states on its download page. You will still need a domain and hosting, and those are usually paid services. Check current prices with each provider.
Do I need to know how to code?
No. You can install WordPress, choose a theme and publish content using its admin screens. Coding knowledge helps later if you want deeper customization.
How long does it take to launch?
The installation itself is quick, since the official guide says it usually takes less than five minutes. The slower parts are choosing hosting, setting up your pages and writing your first content.
Sources
- WordPress.org: Requirements
- WordPress.org: Download
- WordPress Developer Resources: Installing WordPress
- WordPress Documentation: Settings → Reading
- WordPress Documentation: Using Permalinks
Information about WordPress requirements, installation and settings was taken from the official pages listed above, which we reviewed on 9 October 2026. Requirements can change, so check the official pages before you buy or install.